Introduction
This follows on from the recent post to set up Apache2 on Ubuntu 18.04
Step 1 — Installing MySQL
Now that you have your web server up and running, it is time to install MySQL. MySQL is a database management system. Basically, it will organize and provide access to databases where your site can store information.
Again, use apt to acquire and install this software:
sudo apt install -y mysql-server
Step 2 — Securing MySQL
When the installation is complete, run a simple security script that comes pre-installed with MySQL which will remove some dangerous defaults and lock down access to your database system. Start the interactive script by running:
sudo mysql_secure_installation
This will ask if you want to configure the VALIDATE PASSWORD PLUGIN.
Note: Enabling this feature is something of a judgment call. If enabled, passwords which don’t match the specified criteria will be rejected by MySQL with an error. This will cause issues if you use a weak password in conjunction with software which automatically configures MySQL user credentials, such as the Ubuntu packages for phpMyAdmin. It is safe to leave validation disabled, but you should always use strong, unique passwords for database credentials.
Answer Y for yes, or anything else to continue without enabling.
VALIDATE PASSWORD PLUGIN can be used to test passwords
and improve security. It checks the strength of password
and allows the users to set only those passwords which are
secure enough. Would you like to setup VALIDATE PASSWORD plugin?

Press y|Y for Yes, any other key for No:
If you answer “yes”, you’ll be asked to select a level of password validation. Keep in mind that if you enter 2 for the strongest level, you will receive errors when attempting to set any password which does not contain numbers, upper and lowercase letters, and special characters, or which is based on common dictionary words.
There are three levels of password validation policy:

LOW    Length >= 8
MEDIUM Length >= 8, numeric, mixed case, and special characters
STRONG Length >= 8, numeric, mixed case, special characters and dictionary                  file

Please enter 0 = LOW, 1 = MEDIUM and 2 = STRONG: 1
Regardless of whether you chose to set up the VALIDATE PASSWORD PLUGIN, your server will next ask you to select and confirm a password for the MySQL root user. This is an administrative account in MySQL that has increased privileges. Think of it as being similar to the root account for the server itself (although the one you are configuring now is a MySQL-specific account). Make sure this is a strong, unique password, and do not leave it blank.
If you enabled password validation, you’ll be shown the password strength for the root password you just entered and your server will ask if you want to change that password. If you are happy with your current password, enter N for “no” at the prompt:
Using existing password for root.

Estimated strength of the password: 100
Change the password for root ? ((Press y|Y for Yes, any other key for No) : n
For the rest of the questions, press Y and hit the ENTER key at each prompt. This will remove some anonymous users and the test database, disable remote root logins, and load these new rules so that MySQL immediately respects the changes you have made.
Note that in Ubuntu systems running MySQL 5.7 (and later versions), the root MySQL user is set to authenticate using the auth_socket plugin by default rather than with a password. This allows for some greater security and usability in many cases, but it can also complicate things when you need to allow an external program (e.g., phpMyAdmin) to access the user.
If you prefer to use a password when connecting to MySQL as root, you will need to switch its authentication method from auth_socket to mysql_native_password. To do this, open up the MySQL prompt from your terminal:
sudo mysql
Next, check which
authentication method each of your MySQL user accounts use with the following command:
SELECT user,authentication_string,plugin,host FROM mysql.user;
Output+------------------+-------------------------------------------+-----------------------+-----------+
| user             | authentication_string                     | plugin                | host      |
+------------------+-------------------------------------------+-----------------------+-----------+
| root             |                                           | auth_socket           | localhost |
| mysql.session    | *THISISNOTAVALIDPASSWORDTHATCANBEUSEDHERE | mysql_native_password | localhost |
| mysql.sys        | *THISISNOTAVALIDPASSWORDTHATCANBEUSEDHERE | mysql_native_password | localhost |
| debian-sys-maint | *CC744277A401A7D25BE1CA89AFF17BF607F876FF | mysql_native_password | localhost |
+------------------+-------------------------------------------+-----------------------+-----------+
4 rows in set (0.00 sec)
In this example, you can see that the root user does in fact authenticate using the auth_socket plugin. To configure the root account to authenticate with a password, run the following ALTER USER command. Be sure to change password to a strong password of your choosing:
ALTER USER 'root'@'localhost' IDENTIFIED WITH mysql_native_password BY 'password';
Then, run FLUSH PRIVILEGES which tells the server to reload the grant tables and put your new changes into effect:
FLUSH PRIVILEGES;
Check the authentication methods employed by each of your users again to confirm that root no longer authenticates using the auth_socket plugin:
SELECT user,authentication_string,plugin,host FROM mysql.user;
Output+------------------+-------------------------------------------+-----------------------+-----------+
| user             | authentication_string                     | plugin                | host      |
+------------------+-------------------------------------------+-----------------------+-----------+
| root             | *3636DACC8616D997782ADD0839F92C1571D6D78F | mysql_native_password | localhost |
| mysql.session    | *THISISNOTAVALIDPASSWORDTHATCANBEUSEDHERE | mysql_native_password | localhost |
| mysql.sys        | *THISISNOTAVALIDPASSWORDTHATCANBEUSEDHERE | mysql_native_password | localhost |
| debian-sys-maint | *CC744277A401A7D25BE1CA89AFF17BF607F876FF | mysql_native_password | localhost |
+------------------+-------------------------------------------+-----------------------+-----------+
4 rows in set (0.00 sec)
You can see in this example output that the root MySQL user now authenticates using a password. Once you confirm this on your own server, you can exit the MySQL shell:
exit
Step 3 — Update Apache2
sudo apt install -y php-mysql
Reload Apache2
sudo systemctl reload apache2.service
Step 4: Install phpMyAdmin
Now that Apache2 and PHP are installed the final step is to install phpMyAdmin and configure. To do that, run the commands below
sudo apt-get -y install phpmyadmin php-gettext
When prompted to choose the webserver, selecat apache2 and continue.
+------------------------+ Configuring phpmyadmin +-------------------------+
 | Please choose the web server that should be automatically configured to   |
 | run phpMyAdmin.                                                           |
 |                                                                           |
 | Web server to reconfigure automatically:                                  |
 |                                                                           |
 |    [*] apache2                                                            |
 |    [ ] lighttpd                                                           |
 |                                                                           |
 |                                                                           |
 |                                 <ok>                                      |
 |                                                                           |
 +---------------------------------------------------------------------------+
When prompted again to allow debconfig-common to install a database and configure select No.
 +------------------------+ Configuring phpmyadmin +-------------------------+  |                                                                           |  | The phpmyadmin package must have a database installed and configured      |  | before it can be used.  This can be optionally handled with               |  | dbconfig-common.                                                          |  |                                                                           |  | If you are an advanced database administrator and know that you want to
|  | perform this configuration manually, or if your database has already      |  | been installed and configured, you should refuse this option.  Details    |  | on what needs to be done should most likely be provided in                |  | /usr/share/doc/phpmyadmin.                                                |  |                                                                           |  | Otherwise, you should probably choose this option.                        |  |                                                                           |  | Configure database for phpmyadmin with dbconfig-common?                   |  |                                                                           |  |                  <Yes>                   <No>                             |  |                                                                           |  +---------------------------------------------------------------------------+
After installing, run the commands below to logon to the database server to enable phpMyAdmin root logon.
Now, open your web browser and login to the server hostname or IP address followed by phpmyadmin
ex. http://example.com/phpmyadmin

Logon with MySQL root account you created earlier…
Step 5: Secure phpMyAdmin
phpMyAdmin is a popular target for attackers, and you should take extra care to prevent unauthorized access. One of the easiest ways of doing this is to place a gateway in front of the entire application by using Apache’s built-in .htaccess authentication and authorization functionalities.
To do this, you must first enable the use of .htaccess file overrides by editing your Apache configuration file.
Edit the linked file that has been placed in your Apache configuration directory:
sudo vi /etc/apache2/conf-available/phpmyadmin.conf
Add an AllowOverride All directive within the <Directory /usr/share/phpmyadmin> section of the configuration file, like this:
<Directory /usr/share/phpmyadmin>
    Options FollowSymLinks
    DirectoryIndex index.php
    AllowOverride All
    . . .
When you have added this line, save and close the file.
To implement the changes you made, restart Apache:
sudo systemctl restart apache2
Now that you have enabled .htaccess use for your application, you need to create one to actually implement some security.
In order for this to be successful, the file must be created within the application directory. You can create the necessary file and open it in your text editor with root privileges by typing:
sudo vi /usr/share/phpmyadmin/.htaccess
Within this file, enter the following information:/usr/share/phpmyadmin/.htaccess
AuthType Basic
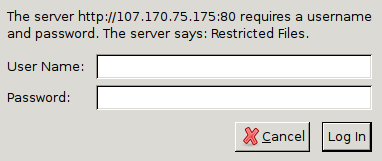
AuthName "Restricted Files"
AuthUserFile /etc/phpmyadmin/.htpasswd
Require valid-user
Here is what each of these lines mean:
AuthType Basic: This line specifies the authentication type that you are implementing. This type will implement password authentication using a password file.AuthName: This sets the message for the authentication dialog box. You should keep this generic so that unauthorized users won’t gain any information about what is being protected.AuthUserFile: This sets the location of the password file that will be used for authentication. This should be outside of the directories that are being served. We will create this file shortly.Require valid-user: This specifies that only authenticated users should be given access to this resource. This is what actually stops unauthorized users from entering.
When you are finished, save and close the file.
The location that you selected for your password file was /etc/phpmyadmin/.htpasswd. You can now create this file and pass it an initial user with the htpasswd utility:
sudo htpasswd -c /etc/phpmyadmin/.htpasswd username
You will be prompted to select and confirm a password for the user you are creating. Afterwards, the file is created with the hashed password that you entered.
If you want to enter an additional user, you need to do so without the -c flag, like this:
sudo htpasswd /etc/phpmyadmin/.htpasswd additionaluser
Now, when you access your phpMyAdmin subdirectory, you will be prompted for the additional account name and password that you just configured:
https://domain_name_or_IP/phpmyadmin
After entering the Apache authentication, you’ll be taken to the regular phpMyAdmin authentication page to enter your MySQL credentials. This setup adds an additional layer of security, which is desireable since phpMyAdmin has suffered from vulnerabilities in the past.